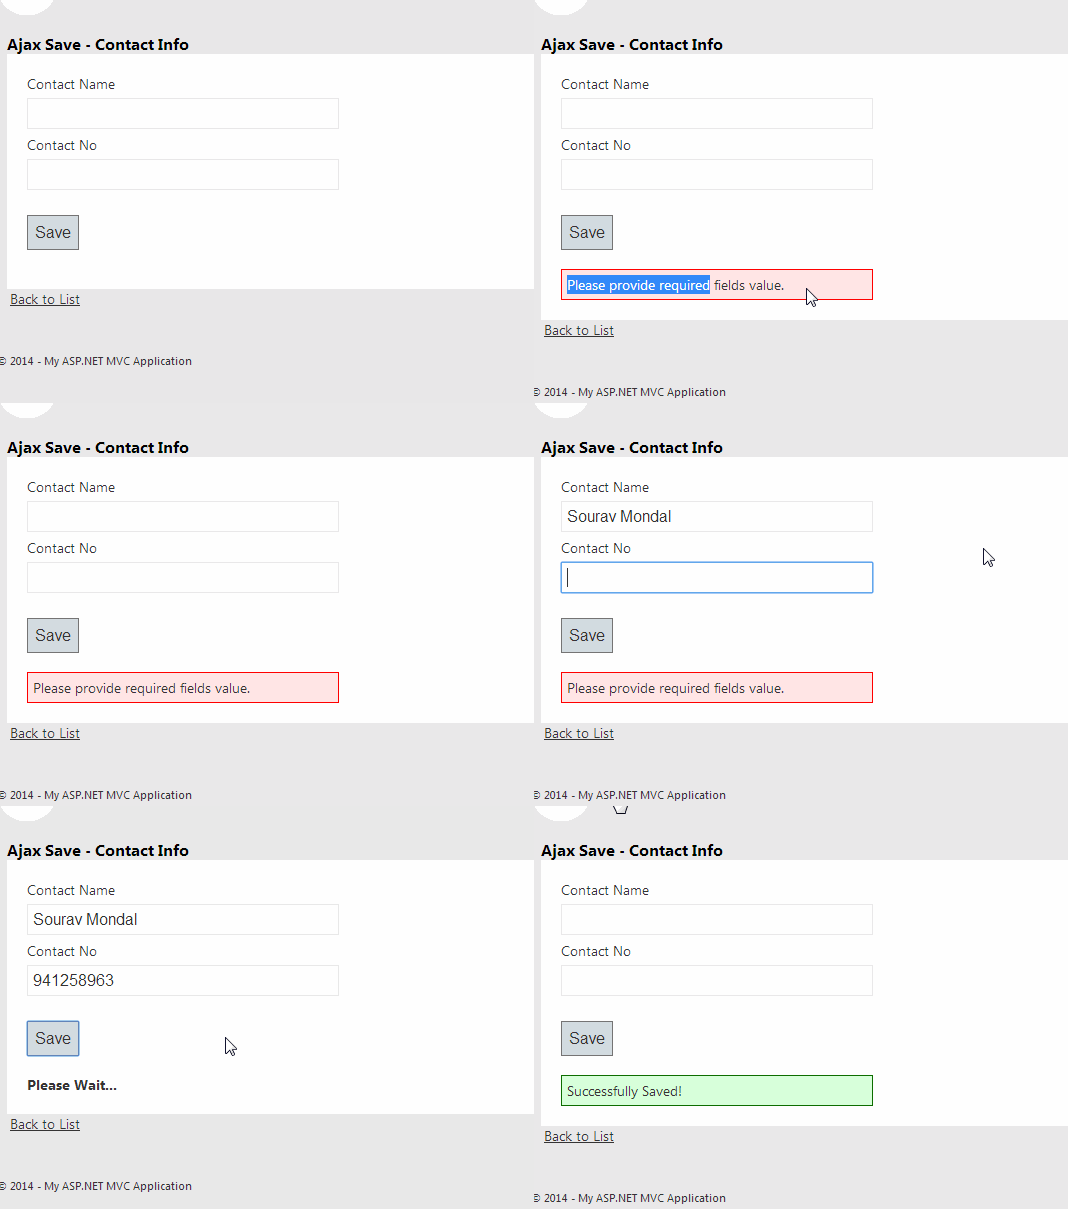
Introduction
In the previous example we have seen that How to insert data into sql server database using jquery (post method) in asp.net MVC 4 Application. But there was not used AntiForgeryToken.AntiForgeryToken is used for prevent CSRF (Cross Site Request Forgery) attack. CSRF is a way of hack where hacker exploits the trust of a website on the user.
Here we will see How to insert data into sql server databse using jquery with Preventing CSRF Attacks in asp.net MVC 4 Application.
Steps :
Step - 1 : Create New Project.
Go to File > New > Project > Select asp.net MVC4 web application > Entry Application Name > Click OK > Select Internet Application > Select view engine Razor > OKStep-2: Add a Database.
Go to Solution Explorer > Right Click on App_Data folder > Add > New item > Select SQL Server Database Under Data > Enter Database name > Add.Step-3: Create table for fetch data.
Open Database > Right Click on Table > Add New Table > Add Columns > Save > Enter table name > Ok.Step-4: Add Entity Data Model.
Go to Solution Explorer > Right Click on Project name form Solution Explorer > Add > New item > Select ADO.net Entity Data Model under data > Enter model name > Add.A popup window will come (Entity Data Model Wizard) > Select Generate from database > Next >
Chose your data connection > select your database > next > Select tables > enter Model Namespace > Finish.
Step-5: Apply Validation On Model.
Open your model and add validation. Please follow below code
namespace MVCAjaxSave
{
 using System;
 using System.Collections.Generic;
 using System.ComponentModel.DataAnnotations;

 public partial class ContactInfo
 {
  public int ID { get; set; }
  [Required(ErrorMessage="Contact Name required!", AllowEmptyStrings=false)]
  public string ContactName { get; set; }
  [Required(ErrorMessage="Contact No required!", AllowEmptyStrings=false)]
  public string ContactNo { get; set; }
 }
}
Step-6: Add a new Controller.
Go to Solution Explorer > Right Click on Controllers folder form Solution Explorer > Add > Controller > Enter Controller name > Select Templete "empty MVC Controller"> Add.Step-7: Add new action into your controller for save data.
Here I have added "Save" Action into "Ajax" Controller. Please write this following code
public ActionResult Save()
 {
  return View();
 }
Step-8: Add view for the Action & design.
Right Click on Action Method (here right click on form action) > Add View... > Enter View Name > Select View Engine (Razor) > Check "Create a strong-typed view" > Select your model class > Add.[N:B:Please Rebuild solution before add view.]
Step-9: Add jquery code for save data to the server.
Jquery Code
<script>
 $(document).ready(function () {
  $("#AjaxPost").click(function () {
   $("#content").html("<b>Please Wait...</b>");

   var dataObject = {
    ContactName: $("#ContactName").val(),
    ContactNo : $("#ContactNo").val()
   };
   // Here Add validation token with dataObject
dataObject.__RequestVerificationToken = $("input[name=__RequestVerificationToken]").val();
$.ajax({
    url: "@Url.Action("Save","Ajax")",
    type: "POST",
    data: dataObject,
    dataType: "json",
    success: function (data) {
     if (data.toString() == "Successfully Saved!") {
      $("#ContactName").val('');
      $("#ContactNo").val('');
      $("#content").html("<div class='success'>"+data+"</div>");
     }
     else {
      $("#content").html("<div class='failed'>" + data + "</div>");
     }
    },
    error: function () {
     $("#content").html("<div class='failed'>Error! Please try again</div>");
    }
   });

  });
 });
</script>
Complete View
@model MVCAjaxSave.ContactInfo
 @{
  ViewBag.Title = "Ajax Save - Contact Info";
 }

 <style>
  .success {
   border:solid 1px rgb(13,109,0);
   width:300px;
   padding:5px;
   background-color:rgb(215,255,218);
  }
  .failed {


   border:solid 1px red;
   width:300px;
   padding:5px;
   background-color:rgb(255,229,229);
  }
 </style>

 <h2 style="font-size:12pt; font-weight:bold;">Ajax Save - Contact Info</h2>

 @using (Html.BeginForm()) {
  @Html.ValidationSummary(true)
  @Html.AntiForgeryToken()
  <fieldset style="background-color:#ffffff">
   <legend>Contact Info</legend>
   <div style="padding:20px;">
    <div class="editor-label">
    Contact Name
   </div>
   <div class="editor-field">
    @Html.EditorFor(model => model.ContactName)
    @Html.ValidationMessageFor(model => model.ContactName)
   </div>

   <div class="editor-label">
    Contact No
   </div>
   <div class="editor-field">
    @Html.EditorFor(model => model.ContactNo)
    @Html.ValidationMessageFor(model => model.ContactNo)
   </div>

   <p>
    <input type="button" value="Save" id="AjaxPost"/>
   </p>
   <div id="content">

   </div>
    </div>
  </fieldset>
 }

 <div>
  @Html.ActionLink("Back to List", "Index")
 </div>

 @section Scripts {
  @Scripts.Render("~/bundles/jqueryval")
  <script>
   $(document).ready(function () {
    $("#AjaxPost").click(function () {
     $("#content").html("<b>Please Wait...</b>");

     var dataObject = {
      ContactName: $("#ContactName").val(),
      ContactNo : $("#ContactNo").val()
     };
     // Here Add validation token with dataObject
     dataObject.__RequestVerificationToken = $("input[name=__RequestVerificationToken]").val();
     $.ajax({
      url: "@Url.Action("Save","Ajax")",
      type: "POST",
      data: dataObject,
      dataType: "json",
      success: function (data) {
       if (data.toString() == "Successfully Saved!") {
        $("#ContactName").val('');
        $("#ContactNo").val('');
        $("#content").html("<div class='success'>"+data+"</div>");
       }
       else {
        $("#content").html("<div class='failed'>" + data + "</div>");
       }
      },
      error: function () {
       $("#content").html("<div class='failed'>Error! Please try again</div>");
      }
     });

    });
   });
  </script>
 }
Step-10: Add another action into your controller for Save Data to the server.
Here I have added "Save" Action into "Ajax" Controller for POST Action. Please write this following code
[HttpPost]
[ValidateAntiForgeryToken]
public ActionResult Save(ContactInfo CI)
{

 string message = "";
 if (ModelState.IsValid)
 {
  try
  {
   using (MyDatabaseEntities dc = new MyDatabaseEntities())
   {
    dc.ContactInfoes.Add(CI);
    dc.SaveChanges();

    message = "Successfully Saved!";
   }
  }
  catch (Exception ex)
  {
   message = "Error! Please try again.";
  }
 }
 else
 {
  message = "Please provide required fields value.";
 }
 if (Request.IsAjaxRequest())
 {
  return new JsonResult { Data = message, JsonRequestBehavior = JsonRequestBehavior.AllowGet };
 }
 else
 {
  ViewBag.Message = message;
  return View(CI);
 }
}
Step-11: Run Application.
Download Application Live Demo
- How to insert data into sql server databse using jquery (post method) in asp.net
- How to insert data into sql server databse using jquery (post method) in asp.net MVC 4 Application.


