Introduction
This is the 3rd part of this series, where I am going to explain how to create career page with upload file (CV) in MVCYou know, Dotnet awesome is a platform to learn, read and explore contents related to web development. Here in this series "Implement basic functionality in asp.net MVC application", I have explained how to create some very basic functionality like create a registration page, login page, file upload page etc., especially for beginners.
I have explained following articles in the series "Implement basic functionality in asp.net MVC application"
- How to create a User Registration page using asp.net mvc
- How to create a login page using asp.net mvc
- How to create career page with Upload file (CV) in MVC
- How to create Feedback page with cascade dropdownlist in MVC.
- How to display database data in webgrid in mvc
Steps :
Step - 1: Create New Project.
Go to File > New > Project > Select asp.net MVC4 web application > Entry Application Name > Click OK > Select Internet Application > Select view engine Razor > OKStep-2: Add a Database.
Go to Solution Explorer > Right Click on App_Data folder > Add > New item > Select SQL Server Database Under Data > Enter Database name > Add.Step-3: Create table for Save data.
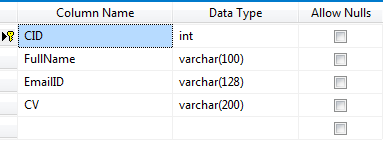
Open Database > Right Click on Table > Add New Table > Add Columns > Save > Enter table name > Ok.In this example, I have used one tables as below
Step-4: Add Entity Data Model.
Go to Solution Explorer > Right Click on Project name form Solution Explorer > Add > New item > Select ADO.net Entity Data Model under data > Enter model name > Add.A popup window will come (Entity Data Model Wizard) > Select Generate from database > Next >
Chose your data connection > select your database > next > Select tables > enter Model Namespace > Finish.
Step-5: Apply validation on model.
Open your model and add validation. Please follow below codenamespace MVCCarrer
{
using System;
using System.Collections.Generic;
using System.ComponentModel.DataAnnotations;
public partial class Carrer
{
public int CID { get; set; }
[Required(ErrorMessage="Please provide fullname", AllowEmptyStrings=false)]
public string FullName { get; set; }
public string EmailID { get; set; }
public string CV { get; set; }
}
}
Step-6: Create a Controller.
Go to Solution Explorer > Right Click on Controllers folder form Solution Explorer > Add > Controller > Enter Controller name > Select Templete "empty MVC Controller"> Add.Here I have created a controller "CarrerController"
Step-7: Add new action into your controller for Get Method
Here I have added "SubmitCV" Action into "Carrer" Controller. Please write this following codenamespace MVCCarrer.Controllers
{
public class CarrerController : Controller
{
public ActionResult SubmitCV()
{
return View();
}
}
}
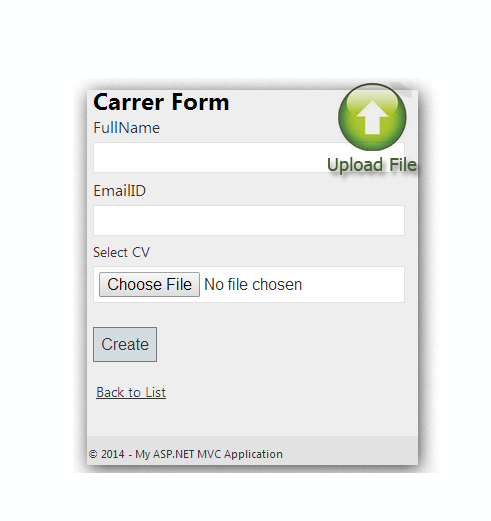
Step-8: Add view for your Action & design for create form.
Right Click on Action Method (here right click on SubmitCV action) > Add View... > Enter View Name > Select View Engine (Razor) > Check "Create a strong-typed view" > Select your model class > Add.HTML Code
@model MVCCarrer.Carrer
@{
    ViewBag.Title = "SubmitCV";
}
<h2>SubmitCV</h2>
@using (Html.BeginForm("SubmitCV", "Carrer", FormMethod.Post, new { enctype="multipart/form-data"}))
{
    @Html.ValidationSummary(true)
    @Html.AntiForgeryToken()
    @* This AntiForgeryTokey is used for prevent CSRF Attack*@
    <fieldset>
        <legend>Carrer</legend>
        @if (ViewBag.Message != null)
        {
            <span style="color:green">
                @ViewBag.Message
            </span>
        }
        <div class="editor-label">
            @Html.LabelFor(model => model.FullName)
        </div>
        <div class="editor-field">
            @Html.EditorFor(model => model.FullName)
            @Html.ValidationMessageFor(model => model.FullName)
        </div>

        <div class="editor-label">
            @Html.LabelFor(model => model.EmailID)
        </div>
        <div class="editor-field">
            @Html.EditorFor(model => model.EmailID)
            @Html.ValidationMessageFor(model => model.EmailID)
        </div>

        <div class="editor-label">
            Select CV
        </div>
        <div class="editor-field">
            <input type="file" name="file" />
            @Html.ValidationMessage("CustomError")
        </div>
        <p>
            <input type="submit" value="Create" />
        </p>
    </fieldset>
}
<div>
    @Html.ActionLink("Back to List", "Index")
</div>

@section Scripts {
    @Scripts.Render("~/bundles/jqueryval")
}
Step-9: Add new Folder to Save CV
Go to Solution Explorer > Right Click on Solution Explorer > Add > New Folder > Enter folder name.Step-10: Add new action into your controller for POST Method
Here I have added "SubmitCV" Action with Model Parameter (here "Carrer") into "Carrer" Controller. Please write this following code[HttpPost]
[ValidateAntiForgeryToken]
public ActionResult SubmitCV(Carrer C, HttpPostedFileBase file)
{
if (file == null)
{
ModelState.AddModelError("CustomError", "Please select CV");
return View();
}
if (!(file.ContentType == "application/vnd.openxmlformats-officedocument.wordprocessingml.document" ||
file.ContentType == "application/pdf"))
{
ModelState.AddModelError("CustomError", "Only .docx and .pdf file allowed");
return View();
}
if (ModelState.IsValid)
{
try
{
string fileName = Guid.NewGuid() + Path.GetExtension(file.FileName);
file.SaveAs(Path.Combine(Server.MapPath("~/UploadedCV"), fileName));
using (MyDatabaseEntities dc = new MyDatabaseEntities())
{
C.CV = fileName;
dc.Carrers.Add(C);
dc.SaveChanges();
}
ModelState.Clear();
C = null;
ViewBag.Message = "Successfully Done";
}
catch (Exception ex)
{
ViewBag.Message = "Error! Please try again";
return View();
}
}
return View();
}
Step-11: Run Application.
Download Application Live Demo
If you are using jquery in your application and you want to implement upload file asynchronously, you should take a look on this article how to upload files asynchronously using ASP.NET MVC4
If you are using jquery in your application and you want to implement upload file asynchronously, you should take a look on this article how to upload files asynchronously using ASP.NET MVC4