Introduction
In this post I am explain How to crop image and save the cropped image using asp.net & jqueryHere I explain how to crop image and save the cropped image using asp.net & jquery. In this example I have used JCrop. JCrop is the quick and easy way to add image cropping functionality to our web application. Using JCrop I get selected Area of uploaded image and using C#.NET code I have saved croped image.
Steps :
Step - 1 : Create New Project.
Go to File > New > Project > Select asp.net web forms application > Entry Application Name > Click OK.Step-2: Add a Webpage and Design for Crop & Save.
Go to Solution Explorer > Right Click on Project name form Solution Explorer > Add > New item > Select web form/ web form using master page under Web > Enter page name > Add.HTML Code
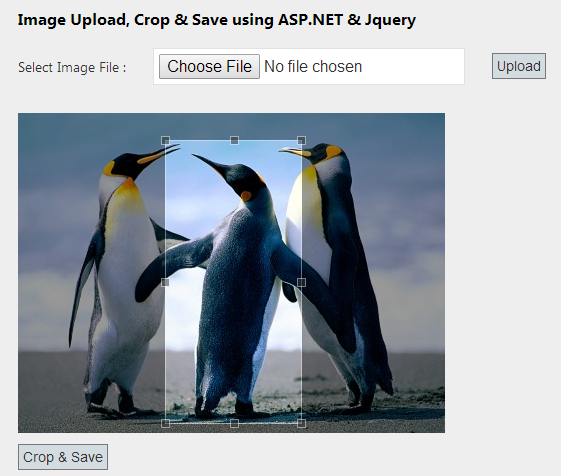
              <h3>Image Upload, Crop & Save using ASP.NET & Jquery</h3>
                <%-- HTML Code --%>
                <table>
                    <tr>
                        <td>
                            Select Image File :
                        </td>
                        <td>
                            <asp:FileUpload ID="FU1" runat="server" />
                        </td>
                        <td>
                            <asp:Button ID="btnUpload" runat="server" Text="Upload" OnClick="btnUpload_Click" />
                        </td>
                    </tr>
                    <tr>
                        <td colspan="3">
                            <asp:Label ID="lblMsg" runat="server" ForeColor="Red" />
                        </td>
                    </tr>
                </table>
                <asp:Panel ID="panCrop" runat="server" Visible="false">
                    <table>
                        <tr>
                            <td>
                                <asp:Image ID="imgUpload" runat="server" />
                            </td>
                        </tr>
                        <tr>
                            <td>
                                <asp:Button ID="btnCrop" runat="server" Text="Crop & Save" OnClick="btnCrop_Click" />
                            </td>
                        </tr>
                        <tr>
                            <td>
                                <%-- Hidden field for store cror area --%>
                                <asp:HiddenField ID="X" runat="server" />
                                <asp:HiddenField ID="Y" runat="server" />
                                <asp:HiddenField ID="W" runat="server" />
                                <asp:HiddenField ID="H" runat="server" />
                            </td>
                        </tr>
                    </table>
                </asp:Panel>
Step-3: Write following JS code in your page Head section.
            <%-- Now I Will add some js & css file Here. This is required for select crop area --%>
            <%-- you can download this Jcrop.css & jquery.Jcrop.js file from Here : https://github.com/tapmodo/Jcrop --%>
            <link href="Scripts/jquery.Jcrop.css" rel="stylesheet" />
            <script src="Scripts/jquery-1.7.1.min.js"></script>
            <script src="Scripts/jquery.Jcrop.js"></script>
            <script language="javascript">
                $(document).ready(function () {
                    $('#<%=imgUpload.ClientID%>').Jcrop({
                        onSelect: SelectCropArea
                    });
                });
                function SelectCropArea(c) {
                    $('#<%=X.ClientID%>').val(parseInt(c.x));
                    $('#<%=Y.ClientID%>').val(parseInt(c.y));
                    $('#<%=W.ClientID%>').val(parseInt(c.w));
                    $('#<%=H.ClientID%>').val(parseInt(c.h));
                }
            </script>
Step-4: Add A folder for Save Uploaded Images.
Go to Solution Explorer > Right Click on Project name form Solution Explorer > Add > New Folder > Remane Folder.Step-5: Write below code in btnUpload_Click event for upload image.
             protected void btnUpload_Click(object sender, EventArgs e)
            {
                // Upload Original Image Here
                string uploadFileName = "";
                string uploadFilePath = "";
                if (FU1.HasFile)
                {
                    string ext = Path.GetExtension(FU1.FileName).ToLower();
                    if (ext == ".jpg" || ext == ".jpeg" || ext == ".gif" || ext == ".png")
                    {
                        uploadFileName = Guid.NewGuid().ToString() + ext;
                        uploadFilePath = Path.Combine(Server.MapPath("~/UploadImages"), uploadFileName);
                        try
                        {
                            FU1.SaveAs(uploadFilePath);
                            imgUpload.ImageUrl = "~/UploadImages/" + uploadFileName;
                            panCrop.Visible = true;
                        }
                        catch (Exception ex)
                        {
                            lblMsg.Text = "Error! Please try again.";
                        }
                    }
                    else
                    {
                        lblMsg.Text = "Selected file type not allowed!";
                    }
                }
                else
                {
                    lblMsg.Text = "Please select file first!";
                }
            }
Step-6: Write code in btnCrop_Click event for Crop & Save Cropped Image.
             protected void btnCrop_Click(object sender, EventArgs e)
            {
                // Crop Image Here & Save
                string fileName = Path.GetFileName(imgUpload.ImageUrl);
                string filePath = Path.Combine(Server.MapPath("~/UploadImages"), fileName);
                string cropFileName = "";
                string cropFilePath = "";
                if (File.Exists(filePath))
                {
                    System.Drawing.Image orgImg = System.Drawing.Image.FromFile(filePath);
                    Rectangle CropArea = new Rectangle(
                        Convert.ToInt32(X.Value),
                        Convert.ToInt32(Y.Value),
                        Convert.ToInt32(W.Value),
                        Convert.ToInt32(H.Value));
                    try
                    {
                        Bitmap bitMap = new Bitmap(CropArea.Width, CropArea.Height);
                        using (Graphics g = Graphics.FromImage(bitMap))
                        {
                            g.DrawImage(orgImg, new Rectangle(0, 0, bitMap.Width, bitMap.Height), CropArea, GraphicsUnit.Pixel);
                        }
                        cropFileName = "crop_" + fileName;
                        cropFilePath = Path.Combine(Server.MapPath("~/UploadImages"), cropFileName);
                        bitMap.Save(cropFilePath);
                        Response.Redirect("~/UploadImages/" + cropFileName, false);
                    }
                    catch (Exception ex)
                    {
                        throw;
                    }
                }
            }
Step-7: Run Application.
Related Post :
- How to Create Simple Image Gallery using repeater control & Jquery in ASP.NET
- How to add Watermark Image (Logo) to an image dynamically while uploading in ASP.NET.
- How to add Watermark Text to an image dynamically while uploading in ASP.NET.
- How to upload image and generate thumbnails dynamically from an original big image.
