Introduction
In this post, I explain How to Create Nested WebGrid with Expand/Collapse in ASP.NET MVC.In one of my previous article, I have explained how to create master details entry form in asp.net MVC application, where we have seen how to save master-details data in our database like Order and order details information. But when we will save master details information, then we should have a way to show master details information on our web page right?
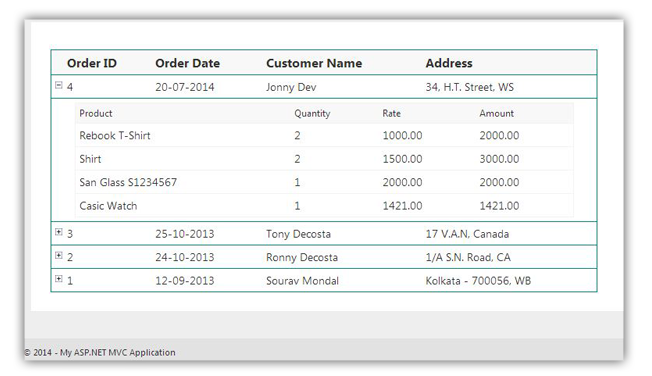
So, here I have explained how to show master-details data in a webgrid in asp.net MVC application. Here we will create nested webgrid with expand/collapse features for showing master-details data.
Steps :
Step - 1: Create New Project.
Go to File > New > Project > Select asp.net MVC4 web application > Entry Application Name > Click OK > Select Internet Application > Select view engine Razor > OKStep-2: Add a Database.
Go to Solution Explorer > Right Click on App_Data folder > Add > New item > Select SQL Server Database Under Data > Enter Database name > Add.Step-3: Create a table for fetch data.
Open Database > Right Click on Table > Add New Table > Add Columns > Save > Enter table name > Ok.Step-4: Add Entity Data Model.
Go to Solution Explorer > Right Click on Project name form Solution Explorer > Add > New item > Select ADO.net Entity Data Model under data > Enter model name > Add.A popup window will come (Entity Data Model Wizard) > Select Generate from database > Next >
Chose your data connection > select your database > next > Select tables > enter Model Namespace > Finish.
Step-5: Add a class for creating a view model.
1st: Add a folder.Go to Solution Explorer > Right Click on the project > add > new folder.
2nd: Add a class to that folder
Go to Solution Explorer > Right Click on that folder > Add > Class... > Enter Class name > Add.
write the following code in this class
             using System.Collections.Generic;

            namespace MVCNestedWebgrid.ViewModel
            {
                public class OrderVM
                {
                    public OrderMaster order { get; set; }
                    public List<OrderDetail> orderDetails { get; set; }
                }
            }
Step-6: Add a new Controller.
Go to Solution Explorer > Right Click on Controllers folder form Solution Explorer > Add > Controller > Enter Controller name > Select Templete "empty MVC Controller"> Add.Step-7: Add new action into your controller for show nested data in a webgrid.
Here I have added "List" Action into "Order" Controller. Please write this following code public ActionResult List()
{
List<OrderVM> allOrder = new List<OrderVM>();
// here MyDatabaseEntities is our data context
using (MyDatabaseEntities dc = new MyDatabaseEntities())
{
var o = dc.OrderMasters.OrderByDescending(a => a.OrderID);
foreach (var i in o)
{
var od = dc.OrderDetails.Where(a => a.OrderID.Equals(i.OrderID)).ToList();
allOrder.Add(new OrderVM { order= i, orderDetails = od });
}
}
return View(allOrder);
}
Step-8: Add view for the Action & design.
Right Click on Action Method (here right click on form action) > Add View... > Enter View Name > Select View Engine (Razor) > Check "Create a strong-typed view" > Select your model class > Add.[N:B:Please Rebuild solution before add view.]
Html Code
            @model IEnumerable<MVCNestedWebgrid.ViewModel.OrderVM>

            @{
                ViewBag.Title = "Order List";
                WebGrid grid = new WebGrid(source: Model, canSort: false);
            }


            <div id="main" style="padding:25px; background-color:white;">
                @grid.GetHtml(
                htmlAttributes: new {id="gridT", width="700px" },
                columns:grid.Columns(
                        grid.Column("order.OrderID","Order ID"),
                        grid.Column(header:"Order Date",format:(item)=> string.Format("{0:dd-MM-yyyy}",item.order.OrderDate)),
                        grid.Column("order.CustomerName","Customer Name"),
                        grid.Column("order.CustomerAddress","Address"),

                        grid.Column(format:(item)=>{
                            WebGrid subGrid = new WebGrid(source: item.orderDetails);
                            return subGrid.GetHtml(
                                htmlAttributes: new { id="subT" },
                                columns:subGrid.Columns(
                                        subGrid.Column("Product","Product"),
                                        subGrid.Column("Quantity", "Quantity"),
                                        subGrid.Column("Rate", "Rate"),
                                        subGrid.Column("Amount", "Amount")
                                    )
                                );
                        })
                    )
                )
            </div>
Css Code
            <style>

            th, td {
                    padding:5px;
                }
                th
                {
                    background-color:rgb(248, 248, 248);
                }
                #gridT,  #gridT tr {
                    border:1px solid #0D857B;
                }
                #subT,#subT tr {
                    border:1px solid #f3f3f3;
                }
                #subT {
                    margin:0px 0px 0px 10px;
                    padding:5px;
                    width:95%;
                }
                #subT th {
                    font-size:12px;
                }
                .hoverEff {
                    cursor:pointer;
                }
                .hoverEff:hover {
                    background-color:rgb(248, 242, 242);
                }
                .expand {
                    background-image: url(/Images/pm.png);
                    background-position-x: -22px;
                    background-repeat:no-repeat;
                }
                .collapse  {
                    background-image: url(/Images/pm.png);
                    background-position-x: -2px;
                    background-repeat:no-repeat;
                }

            </style>
Write the following Jquery code for make webgrid collapsible
            <script>
            $(document).ready(function () {
                var size = $("#main #gridT > thead > tr >th").size(); // get total column
                $("#main #gridT > thead > tr >th").last().remove(); // remove last column
                $("#main #gridT > thead > tr").prepend("<th></th>"); // add one column at first for collapsible column
                $("#main #gridT > tbody > tr").each(function (i, el) {
                    $(this).prepend(
                            $("<td></td>")
                            .addClass("expand")
                            .addClass("hoverEff")
                            .attr('title',"click for show/hide")
                        );

                    //Now get sub table from last column and add this to the next new added row
                    var table = $("table", this).parent().html();
                    //add new row with this subtable
                    $(this).after("<tr><td></td><td style='padding:5px; margin:0px;' colspan='" + (size - 1) + "'>" + table + "</td></tr>");
                    $("table", this).parent().remove();
                    // ADD CLICK EVENT FOR MAKE COLLAPSIBLE
                    $(".hoverEff", this).live("click", function () {
                        $(this).parent().closest("tr").next().slideToggle(100);
                        $(this).toggleClass("expand collapse");
                    });
                });

                //by default make all subgrid in collapse mode
                $("#main #gridT > tbody > tr td.expand").each(function (i, el) {
                    $(this).toggleClass("expand collapse");
                    $(this).parent().closest("tr").next().slideToggle(100);
                });

            });
        </script>
Step-9: Run Application.
Download Application Live Demo


